Overiew
CAMS - College admission management system website with user & admin panel is an application built with PHP MySQL. It is responsive website project which is developed using PHP MySQL.
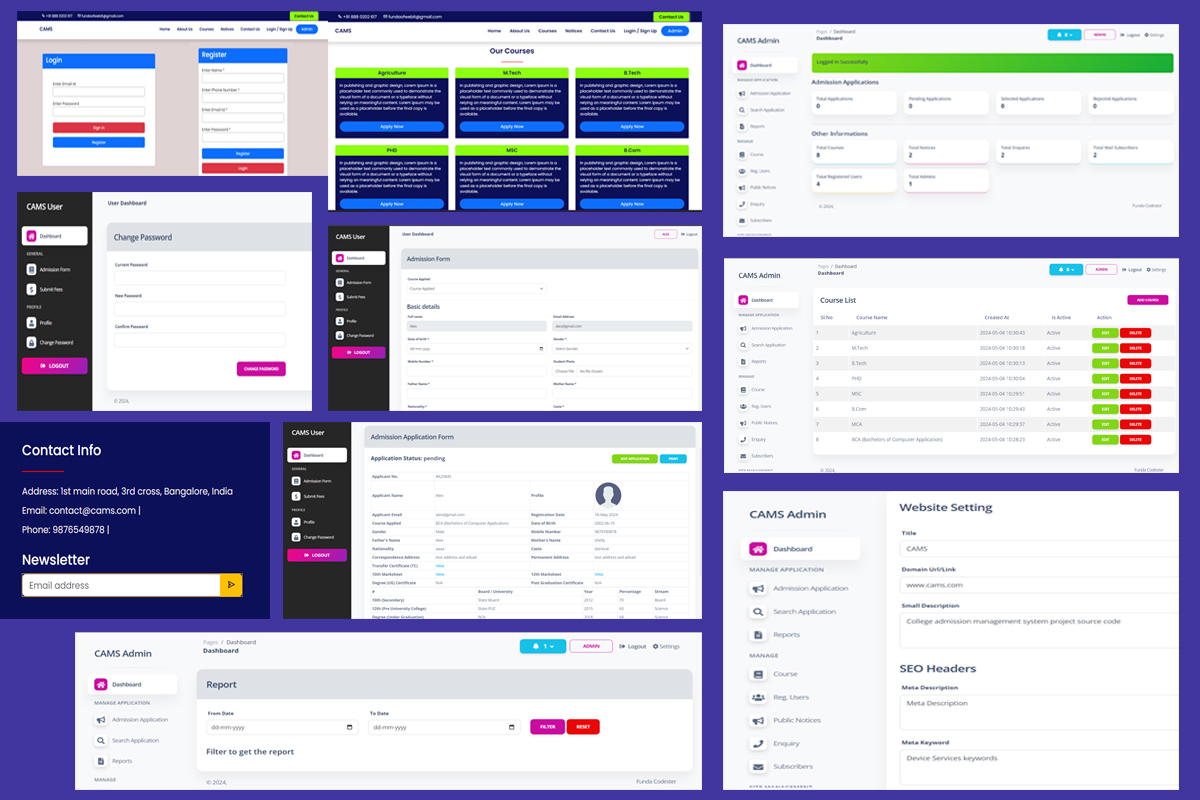
In this project, you can manage the course, notices, enquiries, email subscribers, registered users, admins, social medias, Profile update, change password from the Admin Dashboard. Manage Admission Applications & its fees, view application, search application, view report and update application statuses. You have Settings for website manage like, website name, seo, contact info, email, etc.
From the Student/User Dashboard, you can manage to Apply for the Admission and submit the application form. See the Approval/Rejected/Pending of the applied application. Once its application is "selected" by the ADMIN, you can then do the payment of this applied course from the user dashboard by logging it.
From the Student/User Dashboard also you can change password, update profile and detail on Dashboard.
Features
Website:
Courses:
- List of Courses in CARD view and an apply now button.
- These courses can be hidden & shown by managing from the Admin Dashboard.
Notices:
- Listing all the notices
- These notices can be hidden & shown by managing from the Admin Dashboard.
Contact Us:
- Contact Form with Contact Information.
- Contact Information can be added/updated from Settings in the Admin Dashboard.
- Contact Form Submission: Once the Contact form is submitted, you will be able to see it in the Admin Dashboard & update its status as read or un-read.
Home page:
- Slider
- About Us with static content.
- Latest Notices and view more notices.
About Us Page:
Login Page: Student login Form
Register Page: Student Registration Form
Footer Area:
- CAMS: details can be updated from the Settings - Admin Dashboard
- Social Media: it can be managed from Social Media - Admin Dashboard.
- Contact Information: it can be managed from Settings - Admin Dashboard.
Newsletter (Footer area):
- Enter email id to subscribe it.
- You can find these newsletters (subscribers) in the Admin Dashboard at Subscribers menu.
User Dashboard:
Register & Login to access the Student Dashboard.
Dashboard:
- On this Dashboard page: you will see the Admission Form STATUS like - it is Selected, Pending, Rejected, Is your Fee submitted.
Admission Form:
- Apply for the course: click on "Apply Now" button to open the Admission Form Page.
- Admission Form Page opens: Fill all the required fields & submit the Form.
- Once the Admission Form is submitted, you will be able to see the Admission Form Submitted Details.
- View submitted Admission Form:
4.1: See the Application Status as Selected or Rejected or Pending.
4.2: You can view and download the Uploaded Files/Documents like: TC, Marksheets. - Edit Application (Admission Form): this EDIT option will visible until the Application Status is SELECTED.
- Print: You can print the submitted admission form as PDF.
Submit Fees:
- This is a place to add your fee payment detail.
- You will be allowed to pay once your Admission Application Form is SELECTED.
- So, once Application is Approved from the Admin Dashboard.
3.1: Your Admission Fee Amount will be shown on it.
3.2: You can select the Payment mode type and enter the basic details and Submit it. - Once Payment is done: you will be see the payment details done.
Profile: You can update your profile.
Change Password: You can change your password by providing the Current password.
Logout: you can log out from your dashboard.
Admin Dashboard:
Dashboard:
- You will see the Analytics of your Applications like Admission forms Submissions (Selected, Pending, Rejected, Total).
- Other Information: Total courses, notices, enquires, newsletters (subscribers), registered users, admins.
Notification at Top Corner:
- This notification is about the Admission Form submissions, when any Student submits an application form, the admin will get notified.
- Click on the Notification to view that Admission Application Form.
- Once the Application is "Selected" or "Rejected", the notification will be removed from the Notification dropdown.
Admission Applications Forms:
- List of admission applications.
- Filter the application form by ALL, Pending, Selected, Rejected.
- Can View the application form and see the all file/documents they have uploaded while submitting the application form.
- View application form & Update its STATUS:
4.1: Select Application Status: Selected, Pending, Rejected.
4.2: Enter the Application Remark (Reason).
4.3: Enter the Fee Amount. Also this is conditional on basis of Application Status, where if you select as Rejected, then the FEE Amount input box will be hidden. - Once the Application STATUS is updated, then it will reflect on the Student Dashboard to "Submit Fees".
- View Fees payment information of each selected application.
Search Application:
- Search the Application Form by the "Application Number"
- Reset option for searched application.
- Can VIEW the searched application.
Reports:
- Get the report by filtering From Date - To Date.
- Listing all the filtered records.
Courses:
- List all the courses.
- Create a course.
- Edit & Update details with Active or InActive (Show/Hide).
- Delete course.
Registered Users (Students):
- List all the students.
- Create a user/student.
- Edit & Update details with Banned or Not-Banned.
- Delete user/student.
Public Notices:
- List all the Notices.
- Create a Notice.
- Edit & Update details with Active or InActive (Show/Hide).
- Delete Notices.
Enquiries:
- List all the Enquiries.
- Filter the enquiry status as All, Read, UnRead.
- View the enquiry and update its Status to Read, UnRead.
- Delete enquiry.
Subscribers (NewsLetter):
- List all the Subscribers.
- Delete Subscriber.
Admins:
- List all the admins.
- Create an admin.
- Edit & Update details with Banned or Not-Banned.
- Delete admin.
Social Media:
- List all the Social Media links.
- Create a Social Media.
- Edit & Update details with Show or Hide.
- Delete Social Media.
Settings: This setting is all about Website Setting.
- Update the Title (Website Title)
- Small Description - You can find the content in Footer area.
- SEO Headers:
3.1: Meta Keyword & Description: (Website meta keyword & description) - Contact Information:
You can find the content in Footer area & Contact Us Page.
4.1: 2 email ids.
4.2: 2 phone numbers.
4.3: contact address.
Change Password: You can change your password by providing the Current password.
Logout: you can log out from your dashboard.
Requirements
Host : Localhost
PHP Version : PHP7.x and above
Database : MySQL DB
Web Browser : Chrome, FireFox, Internet Explorer, MS Edge.
Software: XAMPP / Wamp / Mamp/ Lamp (anyone)
Instruction
To run the project on your pc/laptop :
- Download the .zip file and extract the files from it.
- Paste the folder inside the xampp/htdocs folder.
- Open the config folder inside the main folder, you will find a cams.sql file. Import the .sql file in your database.
- Open your project in an editor and setup your database connection in following path: config/dbcon.php
- Open your browser and paste "localhost/cams/" in the browser. Your project will be running successfully.
The Credential for Admin login details are given in the guite.txt file in your project.
Get it for
Free support
Future product updates
Quality checked by fundacodester
Lowest price guarantee

| Category | PHP > College Admission Management System in PHP MySQL |
| First release | 06 May 2024 |
| Last update | 23 Jun 2026 |
| Files included | php, js, html, css, sql |
| Tags | php projects, cams project, college admission project source code |