Overiew
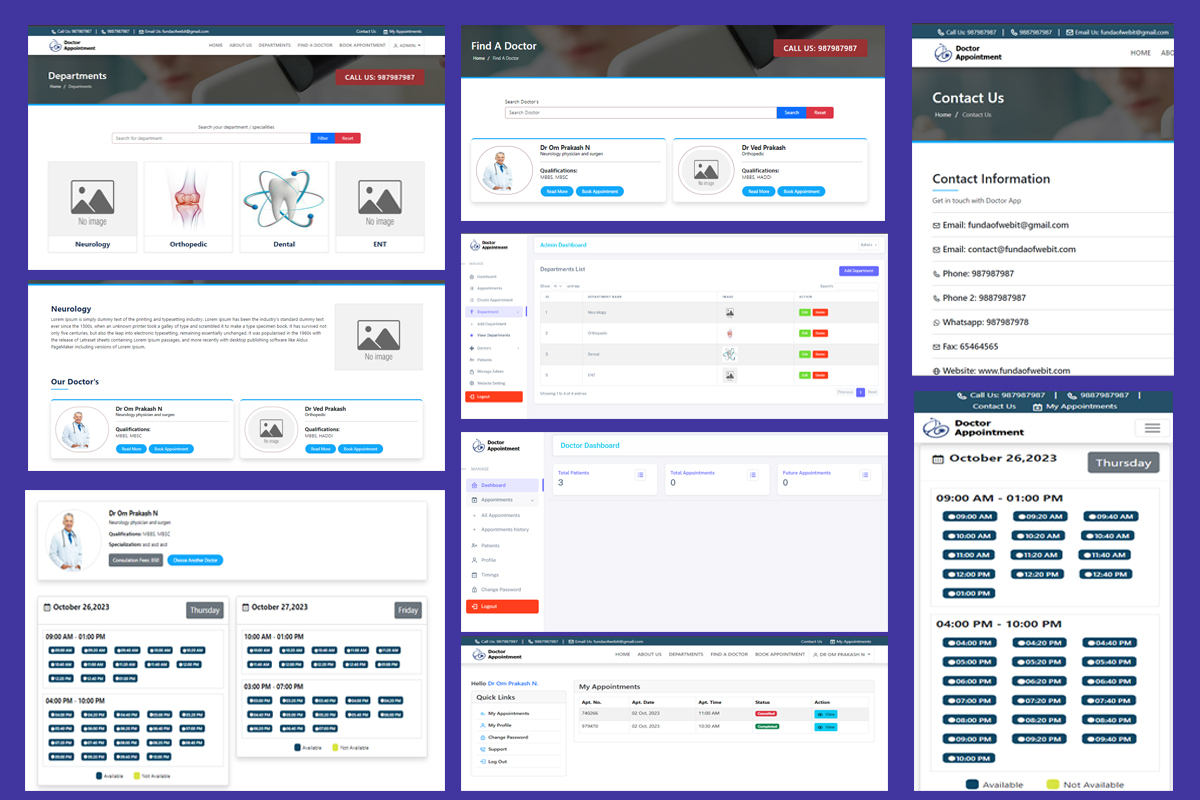
This "Hospital Management & Doctor Appointment Booking System" application is built using Laravel Framework Version 10 and MySQL Database. It has many features on the Admin side like "departments" CRUD and "Doctors" CRUD. View and filter patients and manage all appointments. The Admin can manage his website settings like website name, logo, favicon, contact information and home page SEO details (meta title, keywords & description). Dashboard page to show all analytics.
It has Doctor Dashboard and many features in it like, analytics, appointments, doctor timings, change password.
It has User View, where user can see all his appointments, update profile, change password, etc.
Continue reading Features to understand more about this Doctor Appointment system and Hospital management system.
Features
This "Doctor Appointment Booking System & Hospital Management system in Laravel 10" has various features listed below:
Customer side (Website Pages):
- Login & Register.
- Departments
a. View all departments.
b. View each Department and under each department, doctors are available and you can view doctor details
c. and book an appointment with that doctor. ( explained at point - 4 )
d. You can search for departments by name. - Find a Doctor
a. All Doctors are listed.
b. You can search for the doctor by their designation/department. (eg: Neurology).
c. View each doctor's details.
b. Book Appointment of each doctor. ( explained at point - 4 ) - Book Appointment
a. First select a Doctor and then click on Book Appointment.
b. Doctor Profile and Consultation Fee will be displayed.
c. Appointment Booking can be done only for the next 3 days from the current date.
d. All these appointment timings/slots are managed by its Doctor from his Dashboard.
e. There are 2 colors shown, which are "BLUE" and "YELLOW", where "Blue is open to book the slot" and where "Yellow is already booked the slot".
f. Click on the Available Time/Slot. Which is "Blue" in color to book the slot.
g. Once you click on the Booking slot time, you will get a POP Up Box/Modal, showing that you booking timing and fill in your basic details like name, email, and phone number.
h. Click "Yes" to book the appointment, if not click "Cancel".
i. If you clicked "Yes", then your appointment/slot is booked and you can find your appointments here. ( user/appointments ) - My Appointments ( user/appointments )
a. All appointments listed.
b. View each appointment and see all the details. - My Profile - ( user/profile )
a. Update your profile like name, phone number, age, date of birth, and gender. - Change Password - ( user/change-password )
a. you can change your password by entering the current password, then the new password, and confirm password. - Support - ( user/support )
a. These are contact information and this data is managed from the Admin Dashboard. - Home Page - Has some static content and a slider with an image (Carousel).
- About Us Page - Static Content to showcase your business.
- Contact Us Page - All contact information is managed from the Admin Dashboard.
Doctor Side:
- Dashboard - Showing analytics of patients, and appointments.
- Appointments
a. All appointment lists, which are booked by the customer/patients.
b. Filter the Appointment by DATE.
c. View each appointment and update customer/patient data and update appointment status, payment status, and doctor can write a comment. - Appointment History
a. Listed all completed or canceled appointments as history appointment history.
b. View each appointment and update customer/patient data and update appointment status, payment status and the doctor can write a comment. - Patients
a. All patients lists and these patients only for this doctor.
b. Edit and update patient details.
c. View all appointments of each patient. - Timings
a. Add/Edit/Update/Delete Doctors Timing.
b. Set Average Consultation timings (in minutes).
c. Add the timing as per shifts.
d. These Timings are shown on Book Appointment. ( /book-appointment ) - Change Password - ( user/change-password )
a. You can change your password by entering the current password, then the new password and confirm password.
Admin Side (Admin Dashboard) :
- Dashboard - Showing all analytics like Today Appointments, Future Appointments, Completed Appointments, Total Departments, etc.
- Appointments
a. Lists of today and future dates appointments show by default.
b. Admin can Filter the appointment by DATE and appointment DATE Type.
c. In the Filter option "Appointment Date Type" means, there are 2 dates. 1st is the Appointment Date/Slot Date and 2nd is the appointment created date (The Appointment Submission date)
d. You can view each appointment and see its details. - Appointment Create
a. Appointment Create is a booking of DATE/SLOT with the particular doctor.
b. Lists of Doctors will be shown. Click on the button "Book Appointment", it will take you to the website with the selected doctor and there you can book the appointment/slot as explained in point 4 ( explained in Website Pages- Point - 4 ) - Departments
a. Add/Read/Edit/Update/Delete - Department details with image upload and show/hide option from Checkbox.
b. If the checkbox is checked, then that department is visible on the website, if you un-check the checkbox, it's hidden from the website. - Doctors
a. Doctor - CRUD (Admin can Add/Read/Edit/Update/Delete doctors with details and image and set as active/in-active using checkbox)
b. Lists of doctors.
c. Admin can view doctor timings.
d. Admin can edit doctor details.
e. Admin can view doctor's patients list. - Patients
a. On this page, you need to "Select Doctor" and click filter to get the list of patients of selected doctors.
b. View each patient and appointment lists. (Previous and upcoming) - Admins
a. Admin CRUD (Add/Read/Edit Update/Delete)
b. Update the status for the Admin is active or in-active (Ban/Active) by checking the Checkbox. - Website Setting
a. You can update website information like website name, url, Logo, Favicon, and copyright content.
b. You can update the Contact Information like 2 email IDs, 2 phone numbers, a fax, a WhatsApp number, Address. (These details are used to show all over the website.)
Requirements
Host : Localhost
Composer
PHP Version : 8.1 and above
Database : MySQL DB
Web Browser : Chrome, FireFox, Internet Explorer, MS Edge.
Instruction
- Extract the downloaded .zip file.
- Run the following command: "composer install" - to install the required packages.
- Setup Database in .env file.
- You will have a .sql file (DB) inside the public folder (named as doctorappointment.sql) containing all the data shown in the video. You can import this .sql file in your database (if you are importing the .sql file, you can skip step 5). If you want a fresh database, you can skip Step 4.
- Run the migrate command : "php artisan migrate".
- The project is ready to run. Run the command : "php artisan serve" and you have your project running.
After importing your .sql file in the database.
Login Credentials
Email Id: [email protected]
Password: 12345678
Get it for
Free support
Future product updates
Quality checked by fundacodester
Lowest price guarantee

| Category | Laravel > Doctor Appointment Booking System in Laravel | Hospital Management System |
| First release | 23 Oct 2023 |
| Last update | 23 Jun 2026 |
| Files included | php, blade, larave, .sql, js, css, lock |
| Tags | doctor appointment system in laravel, hospital management system in laravel |